# Level 3 Certification
Table of Contents
A typical certification and integration project includes following steps :
- Integrate to Acquirer Host (through Lego or direct)
- Set Up L3 Test Environment
- Execute L3 Tests
- Test Acquirer Host Integration
- Submit Reports to Brands
- Get Letter of Approval
- UAT Tests
- Pilot
- Go Live
In this document, we will discuss about L3 certification. Other steps are out of the scope of this document.
Setting up L3 Test Environment includes following steps (for brand new certification) :
- Poynt gives the partner access to Poynt platforms (Mission Control, Graylog, Lego)
- Partner fills up the New Partner Onboarding Checklist and validated by Poynt
- Partner fills up the Data Collection Forms and validated by Poynt
- Poynt creates EMV Configuration File
- Poynt/Partner sets up test terminal (Get right test MID and TIDs, we may need different ones for Amex ATS tests)
- Poynt tests EMV Configuration File (initial sanity tests)
- Poynt tests acquirer host connection (making sure host is up and running)
- Poynt ensures that store settings are correct
- Poynt pushes EMV configuration file to partner devices
- Partner gives Poynt Amex ATS credentials
- Poynt checks what L3 tools partner use. (i.e Visa payWave tool or UL BTT tool for Visa tests) and tries to make the same tools available as much as possible.
- Partner configures L3 test tool and send to Poynt L3 Test tool configuration files (TPP and TSE) and these files are validated by Poynt
- Partner starts L3 tests
Setting up L3 Test Environment includes following steps (for repeat certification) :
- Partner defines the scope of testing
- Poynt checks the list of updates in the golden file and reflect them in their configuration
- Poynt creates EMV Configuration File
- Poynt/Partner sets up test terminal (Get right test MID and TID)
- Poynt tests EMV Configuration File (initial sanity tests)
- Poynt tests acquirer host connection (making sure host is up and running)
- Poynt ensures that store settings are correct
- Poynt pushes EMV configuration file to partner devices
- Poynt checks what L3 tools partner use. (i.e Visa payWave tool or UL BTT tool for Visa tests) and tries to make the same tools available as much as possible.
- Partner configures L3 test tool and send to Poynt L3 Test tool configuration files (TPP and TSE) and these files are validated by Poynt
- Partner starts L3 tests
# Set Up L3 Test Environment
# Get access to Poynt platforms
Partner is given access to Lego, Graylog and Mission Control.
# Get L3 Certification Requirements from Acquirer
To start L3 certification process, the first step is to understand acquirer’s L3 requirements.
Partner needs to fill out the L3 Certification checklist in this link: Google Drive Link (opens new window)
L3 Certification Checklist includes partner’s requirements in terms of L3 certification. These requirements includes many items like cardholder verification methods, supported AIDs, key encryption mechanism, etc.
The form filled by partner is validated and confirmed by Poynt. This data is used as source of truth for following items :
- Data Collection Forms
- Test Tool Configuration Settings (TSE and TPP files)
- EMV Configuration File Preparation
# Fill Up Data Collection Forms
- Fill up Data Collection forms
- Get Poynt to validate the Data Collection Forms
- Acquirer submits Data Collection forms to brands for verification
# Create EMV Configuration File
- If it is a brand new integration and certification :
- Get the most up-to-date golden configuration file
- Update the acquirer specific or market specific parameters based on L3 Certification Checklist
- Update payment brand specific configuration parameters for L3 tests (Floor Limit, Contactless Limits, DRL settings and some other parameters defined in the test specifications of payment brands.)
- If it is a repeat or continuation of an already existing integration or certification :
- Get the final production file
- Replace the production keys to test keys
- Update the critical golden file items in the configuration file (See Section “Key Updates in Golden Files”)
- Update the acquirer specific or market specific parameters based on L3 Certification Checklist
- Update payment brand specific configuration parameters for L3 tests Floor Limit, Contactless Limits, DRL settings and some other parameters defined in the test specifications of payment brands.
GoldenVersionTerminalConfFile_L3Tests
# Set up Test Terminal
- Communicate with acquirer to get MID and TID
- Ensure terminal is in secure mode to inject test keys
- Use a version of Android application fully tested by Poynt QA team.
- Get the EMV configuration file from Poynt
- Set up the test device with the right MID, TID, EMV configuration file and right PIN and Data keys.
- Ensure acquirer host is up and test simulator is working
# Test EMV Configuration File
- Poynt performs smoke tests on EMV test configuration file.
- After getting all tests passed, config file is ready for use by partner.
# Test Acquirer Host Connection
- Make sure that acquirer host is up and running
- Deploy the Lego adaptor in the test environment and make sure it works fine.
# Make Sure That Store Settings are Correct
Make sure following parameters are set correctly in Mission Control :
- Debit AIDs : This list should include only U.S Common Debit AIDs :
| Debit | AID |
|---|---|
| UnionPay U.S Common Debit | A000000333010108 |
| MasterCard U.S Common Debit | A0000000042203 |
| Visa U.S Common Debit | A0000000980840 |
| Discover U.S Common Debit | A0000001524010 |
| Debit Network Alliance | A0000006200620 |
- Chip (EMV-CT) : On
- NFC (EMV-CL) : On
- Enable Cashback : On
- Cashback limit : 30000
- Chip (EMV-CT) debit : On
- NFC (EMV-CL) debit : On
- Skip CVM : Off
# Get Amex ATS credentials
Amex uses a special tool (ATS) for Amex host tests. It should be ensured that the partner has access to the ATS.
- Get Amex ATS credentials
- Make sure Amex Level 3 configuration is set correctly in the ATS
- Check if Amex requires different MID/TID for ATS tests
# Configure L3 Test Tool
Ensure L3 Test Tool (.tpp and .tse) files are correctly configured. Check the configuration of these files against L3 Certification Checklist document and make sure everything is set correctly.
L3 Certification Checklist is used as a base document during setting up parameters. Make sure that following features are set correctly :
- Refund
- Online refund supported
- Offline refund not supported
- Maximum keyed amount : 999999999
- Contactless Magstripe mode
- Not supported for Mastercard and Visa
- Supported for other schemes
- Additional Services Supported for contact and contactless
- Partial Approval, Refund, Payment of gratuity and manual key entry
- MasterCard Integrated Data Storage : Not supported
- CVM Limits
- Contactless Transaction Limit should be set above Contactless CVM limit as some transactions require the transaction amount above Contactless CVM limit
- 9F6D (Terminal Risk Management Data) needs to be configured the same with configuration file
- Contactless Interface - MasterCard - CVM supported above CVM Required Limit : Signature
- Contactless Interface - MasterCard - CVM supported above CVM Required Limit : Signature
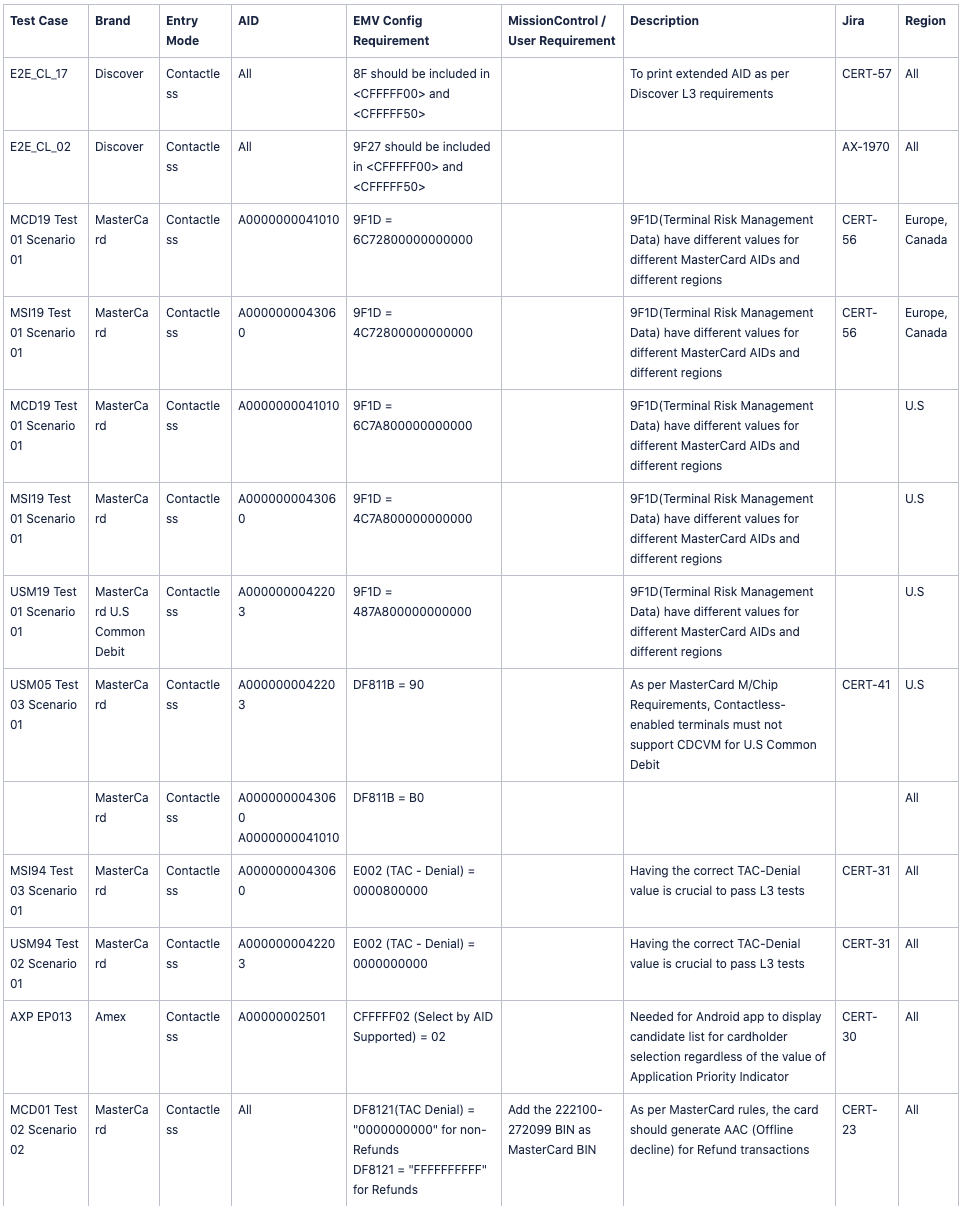
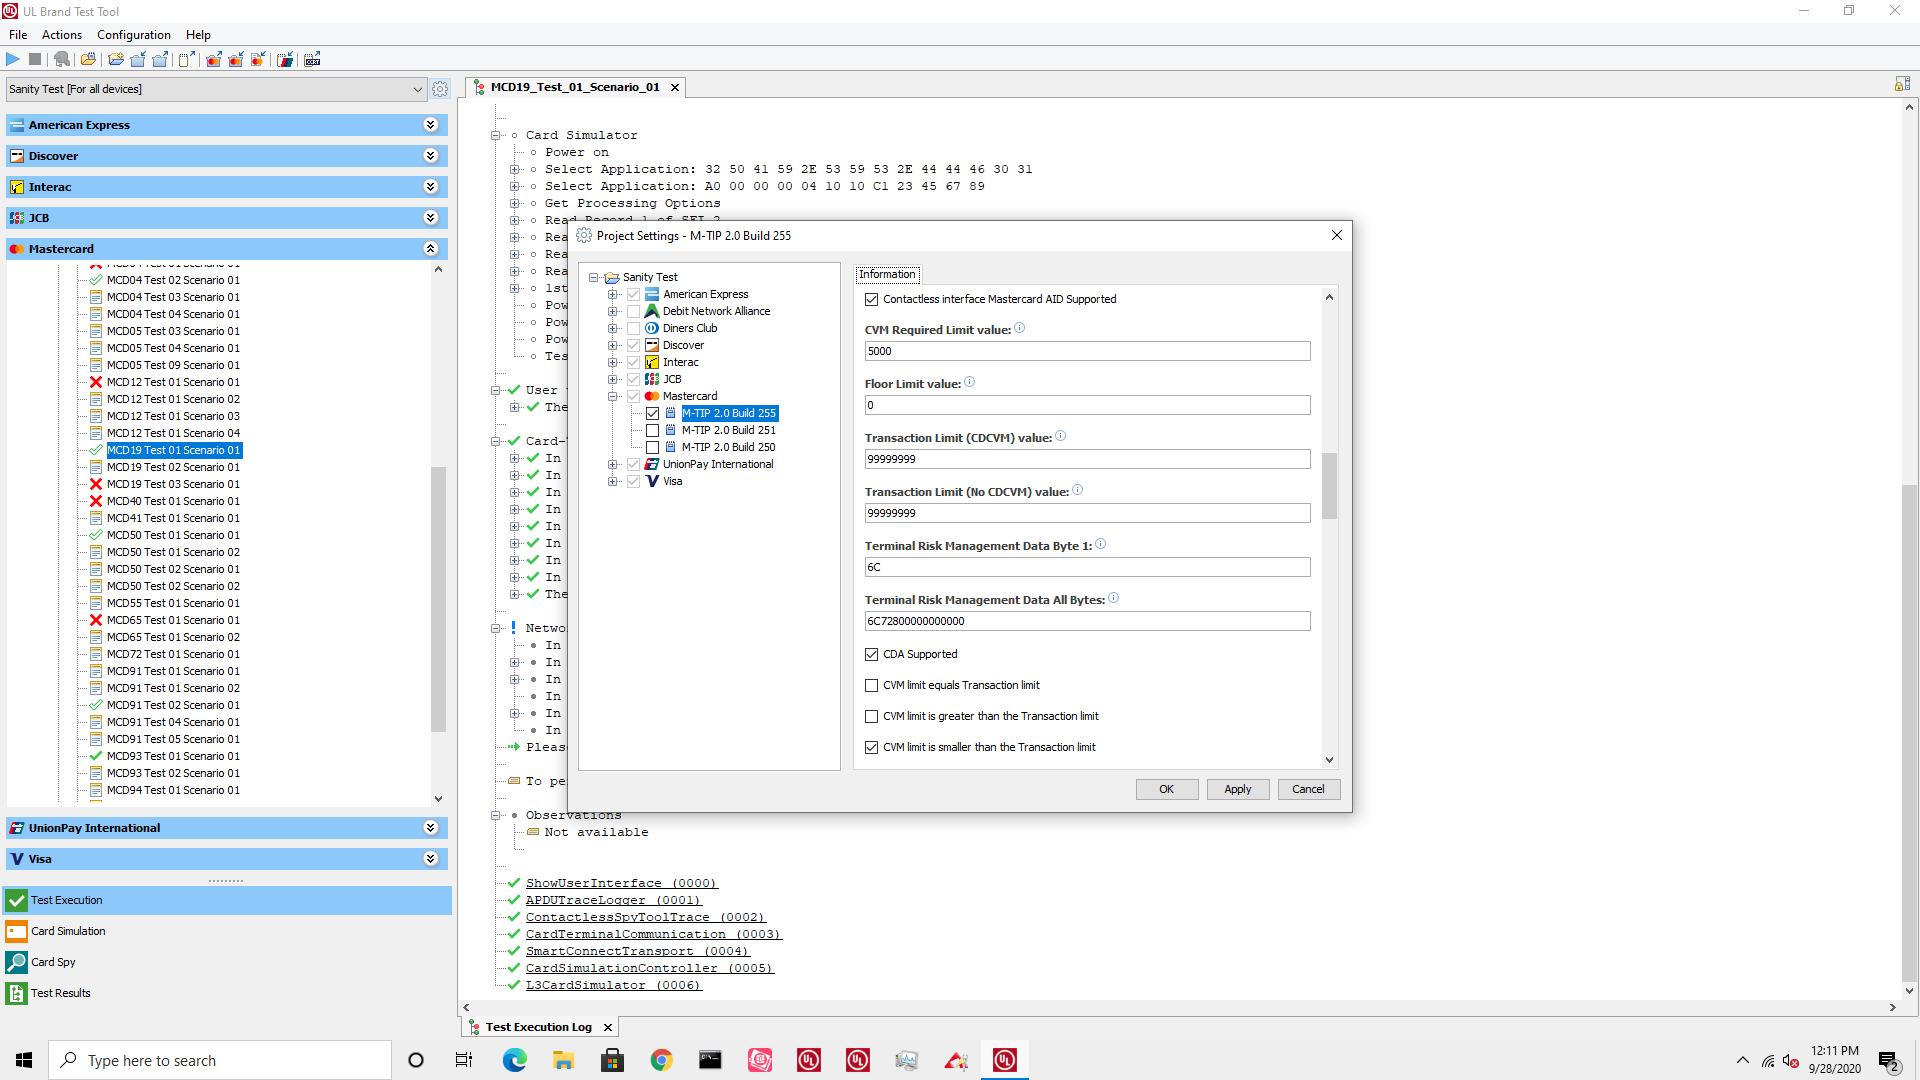
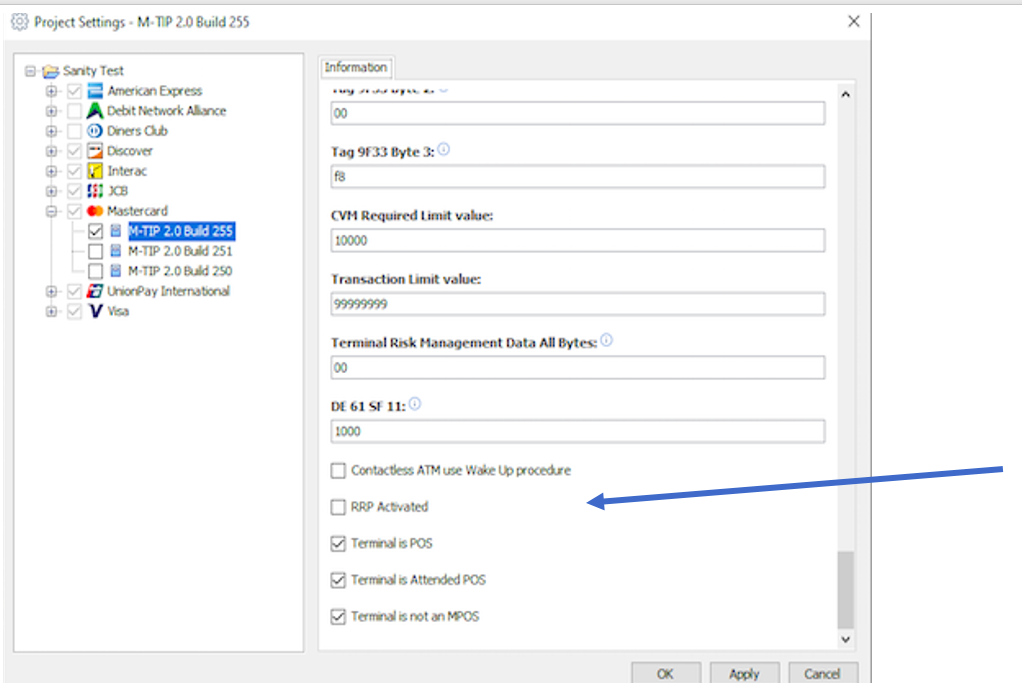
# Terminal Risk Management Data Settings for MasterCard AIDs
Make sure that Terminal Risk Management Data is correctly configured in the L3 Test Tool configuration. If this is not correctly configured, following test cases will fail :
- MCD 19 01 01
Terminal Risk Management Data :
- 6C7A800000000000 for MasterCard Credit/Debit (AID : A0000000041010) for U.S
- 6C72800000000000 for MasterCard Credit/Debit (AID : A0000000041010) for Europe and Canada
- 487A800000000000 for MasterCard U.S Common Debit (AID : A0000000042203)
- 4C7A800000000000 for Maestro (AID : A0000000043060) for U.S
- 4C72800000000000 for Maestro (AID : A0000000043060) for Europe and Canada
# Relay Resistance Protocol for MasterCard tests
Relay Resistance Protocol is not supported by Poynt L2 kernel. Please make sure that RRP Activated is toggled off in the L3 Test Tool configuration
# Executing Level 3 Tests
Partner executes Level 3 tests with Level 3 test tool. During tests, it is important to know how to set certain configurations in Poynt platforms. Some test cases require manual operations, some others require to set the right configuration on the Mission Control. We will explain how to perform these operations in this Section.
# Application Selection Options and Debit/Credit Selection
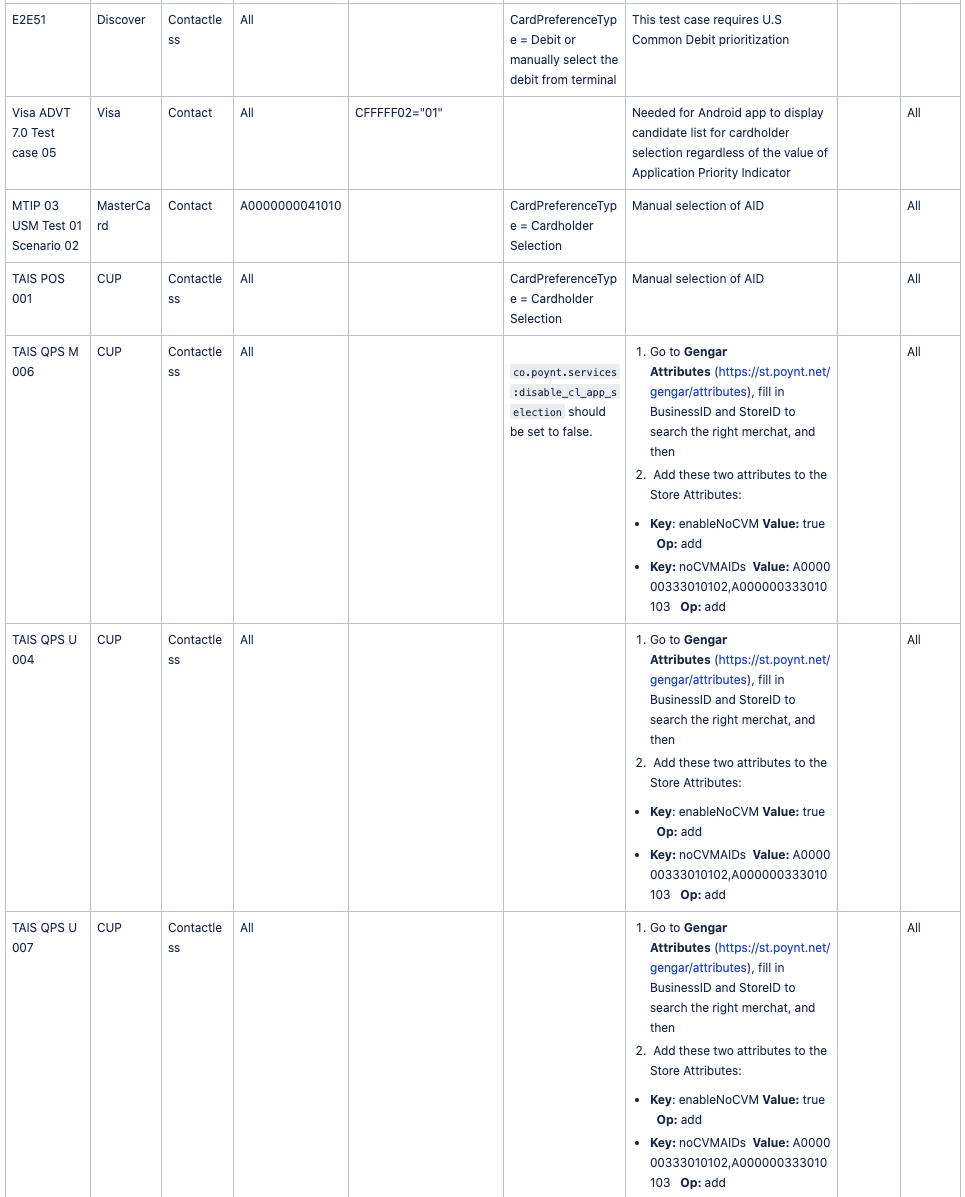
# U.S Common Debit
For both contact and contactless EMV transactions, terminal may use the EMV application selection logic or the U.S Common Debit AID prioritization logic. This special logic is applicable only in the U.S market to give the priority to the U.S Common Debit AID if the card has U.S Common Debit and Global AIDs. To enable this feature on/off and to define the list of U.S Common Debit AIDs, Mission Control has following fields :
- CardPreferenceType : This attribute may be selected as Credit or Debit based on the market and acquirers/merchants decision.
- Debit : Debit AIDs are always selected against Credit AIDs regardless of the priority of the AIDs.
- Credit : Standard EMV logic is implemented to select the AID with the highest priority.
- Cardholder decision : List of AIDs are prompted on the terminal screen for cardholder selection.
- Debit AIDs : List of U.S Common Debit AIDs. This list contains only U.S Common Debit AIDs. Although there are other debit AIDs in the U.S market, these AIDs should not be defined in this list as this rule applies only to U.S Common Debit AIDs.
# Credit/Debit Options and Prioritizing U.S Common Debit AID
Test cases may require one of the following conditions for Application Selection Process:
- Automatic selection of the AID with the highest priority based on EMV specs (Selecting Debit using Debit/Credit button) (Applies EMV contact and contactless transactions)
- Manual selection of the AID by the cardholder based on EMV specs. (Applies to EMV contact transactions)
- Prioritizing U.S Debit where special logic is needed for the U.S Common Debit AID selection. (Selecting Debit using Debit/Credit button) (Applies to EMV contact and contactless transactions)
There are 2 ways for tester to configure these options :
- Set the
CardPreferenceTypein the Mission Control as “Cardholder Selection“- Select “Credit“ from drop-down menu on the terminal if the test case requires automatic selection of the AID with the highest priority (Option 1).
- Select “Debit“ from drop-down menu on the terminal if the test case requires Prioritizing U.S Debit AID (Option 3)
- No need to select any option from drop-down menu on the terminal if the second option is required by the test. (Option 2)
- Manual selection of debit/credit from drop-down menu on the POS terminal.
- Set
CardPreferenceTypein the Mission Control as “Credit“ if the test case requires automatic selection of the AID with the highest priority (Option 1). - Set
CardPreferenceTypein the Mission Control as “Cardholder Selection“ if the test case requires manual selection of the AID by the cardholder (Option 2). - Set
CardPreferenceTypein the Mission Control as “Debit“ if the test case requires Prioritizing U.S Debit AID (Option 3)
- Set
# PIN Entry Cancel Options
In a U.S Common Debit card, both U.S Common Debit AID and Global Debit AID exist for the same BIN (IIN). A transaction performed with U.S Common Debit AID generally requires Online PIN if the transaction amount is above the CVM limit. However, user may want to have a PINless transaction by cancelling PIN entry.
PIN Entry Cancel Options apply to both EMV contact and contactless. For Visa, test tool gives 2 options if the US Common debit application is selected and the cardholder exits from PIN entry prompt :
- The terminal restarts the transaction and selects the Visa Debit AID
- The terminal applies EMV PIN Entry Bypass
If L3 test tool is configured with the Option 1 above, terminal should restart the transaction and select the Global Debit AID when the US Debit AID is selected and the cardholder exits from PIN entry. In order to configure the terminal with Option 1, you need to have in the Mission Control “Disable LCDR Flow” is toggled off. (under Edit Store)
When “Disable LCDR Flow” is toggled off :
- If selected AID is U.S Common Debit AID and PIN in cancelled by the user, then terminal restarts the transaction by selection the AID not being U.S Common Debit AID.
- If selected AID is not U.S Common Debit AID, this parameter doesn’t have any impact and terminal performs EMV PIN Bypass methods as defined before.
If Disable LCDR Flow is toggled on, then EMV PIN Bypass methods are implemented when PIN is cancelled as following :
- If 1F8114 is 01 (PIN bypass supported), then the transaction continues when user cancels the PIN by setting TVR bit (PIN entry is cancelled by the user)
- If 1F8114 is 00 (PIN bypass NOT supported), then the transaction is cancelled.
Following table shows options when US Common debit application has been selected and the cardholder exits from PIN entry prompt :
| Terminal Behavior | MC Setting | EMV Config File Setting (1F8114) | Interface |
|---|---|---|---|
| Restart the transaction and Select the Global Debit AID | “Disable LCDR” toggled off | No impact of 1F8114 parameter to the terminal behavior | CT and CL |
| EMV PIN Entry Bypass supported. Terminal proceeds without PIN and go to online | “Disable LCDR” toggled on | 1F8114 = 01 (PIN Entry bypass supported) | CT and CL |
| EMV PIN Entry Bypass not supported. Terminal terminates the transaction. | “Disable LCDR” toggled on | 1F8114 = 00 (PIN Entry bypass not supported) | CT and CL |
Please perform Data Synch from Settings -->Developer Preferences → Data Synch to update Mission Control settings to the terminal.
# Level 3 Test Cases Execution Requirements
CDET 1C 2 : This test case requires terminal dynamically enable "Online PIN" and disable "Signature" CVM if the transaction type is cash-back. Currently we don't support this feature. (Visa gave a waiver for this test case)
CDET 1C.6 : Test N/A for the implementation scenario. CDET 1C.1 is the appropriate test for this verification.
AXP MAG 001 (ANSI card) and AXP MAG 002 (ISO card) : These test cases are done with real MSR cards rather than test tool probe. Make sure that you have these cards in your hand.
AXP EMV 035, AXP EP 084, AXP EP 085 : These test cases require specific Online PIN display messages on the terminal screen. Make sure that these messages are defined in the Lego adaptor.
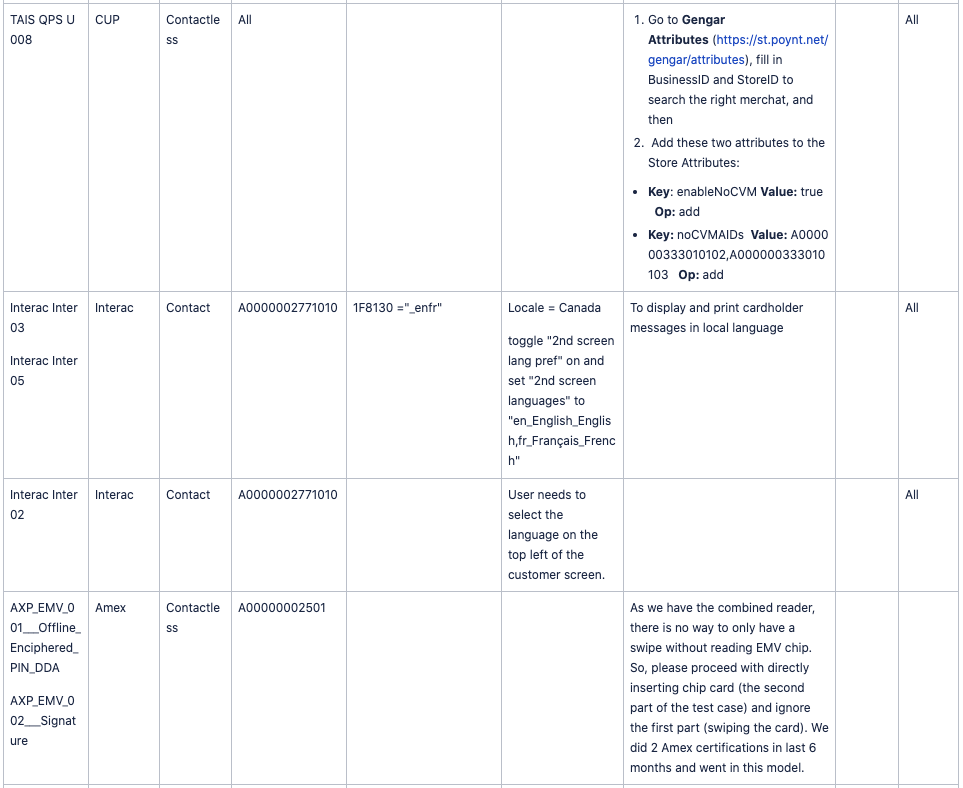
AXP EMV 002 : This test case requires the swipe the card first, then the terminal to prompt inserting EMV chip and then it proceeds with the transaction. As Poynt terminals have a hybrid card reader it is not possible to swipe the card only. In case of hybrid card reader when you dip a card it reads the chip directly. To pass this test case, please ignore the first part of it (swiping part) and proceed to the second part (inserting the EMV card and proceeding with the transaction).
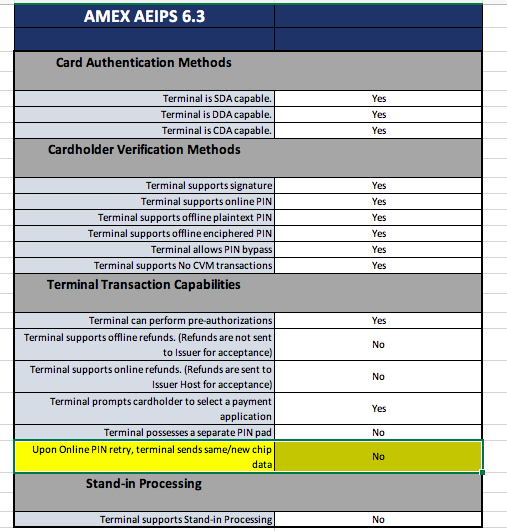
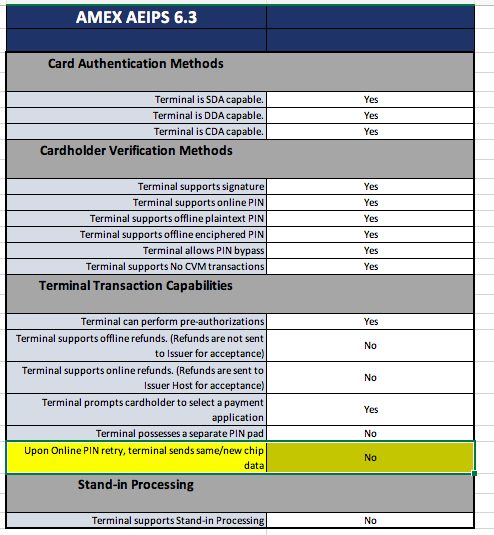
AXP EMV 035 : This test case requires the terminal to send same/new chip data upon online PIN retry. However, this feature is not supported by Poynt. Please make sure that Amex ICS form has the following setting :
MTIP 16 Test 01 Scenario 01 : This test is for terminals supporting No CVM. If terminal is not supporting No CVM transactions (i.e in Europe), then this test case is not applicable.
MCD 01 Test 11 Scenario 01 : This test case requires tip turned on in Mission Control. Some test cases require manual application selection. The CardPreferenceType in the Mission Control should be set as "Cardholder Selection" for following test cases :
- MTIP 03 USM Test 01 Scenario 02
- TAIS POS 001
Some test cases require U.S common debit card to be prioritized. There are 2 options for these test cases :
CardPreferenceTypein the Mission Control may be set as “Debit“CardPreferenceTypein the Mission Control may be set as “Cardholder Selection“ and user selects explicitly “Debit“ from terminal menu for each test case.
Following test cases require this E2E 51
E2E 35 : This Discover test case requires the terminal to allow an MSR transaction without setting the fallback in the Pos Entry Mode in the authorization message if the the card responds a negative response to the Final App Selection command. (This means that this is an unknown AID). However, currently our firmware doesn't support it. The only way to perform a MSR transaction with an EMV card (with service code starting 2 or 6) is the fallback situation.
For CUP test cases TAIS QPS M 006, TAIS QPS U 004, TAIS QPS U 007 and TAIS QPS U 008, you need to perform following steps :
- Go to Gengar Attributes (opens new window), fill in BusinessID and StoreID to search the right merchat, and then
- Add these two attributes to the Store Attributes:
| Key | Value | Op |
|---|---|---|
| enableNoCVM | true | add |
| noCVMAIDs | A000000333010102,A000000333010103 | add |
# Level 3 Test Requirements